Table of contents
What is Exposure?
What is Shutter Speed?
What is Aperture?
What is ISO?
How to Properly Expose Your Photos
Camera Settings Example
keep In Focus
What is Exposure?
What is exposure and how do we photographers use it? That question, although it seems complicated, is actually quite simple. Exposure is how light or dark your image is. If you have a high exposure then your photo is quite bright and you lose detail in the highlights. The opposite is true for low exposure, the image is quite dark and you lose detail in the shadows. There are three simple settings to control exposure. Those settings are shutter speed, aperture, and ISO speed. When talking about their adjustments you must think about them in stops of light or commonly referred to as f-stops. A change in exposure of 1 f-stop will either give you half as much light, a step down, or twice as much light, a step up. (Learn more about stops of light)
How to know your exposure
In standard shooting conditions, achieving the correct exposure in your final image is crucial. Use your camera’s histogram to guide you. If the pixels lean more to the left, the dark parts approach pure black, but it’s easier to recover details from dark areas. If they lean right, your image will be brighter, with whites closer to pure white. Excessive pure black or white removes details, so aim to keep your histogram away from extremes, unless it fits your style. If lighting conditions make this challenging, prioritize proper exposure for your highlights to maintain overall image quality.
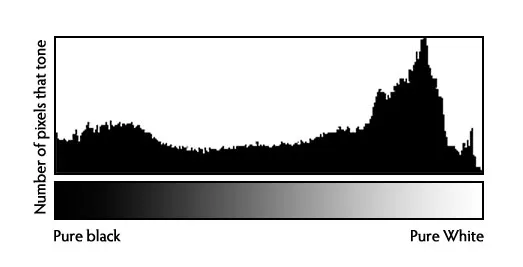
This is a histogram showing proper exposure for highlights. If the pixels were stacked all the way against the right side then some adjustments would need to be made.
Exposure is a balancing between these settings and they are key for taking a great photo, a bad photo, or for finding your own style. Below I will explain these settings and how you can use them to take great photos in seconds and never wonder if you are using the right settings for your photo.
What is Shutter Speed?
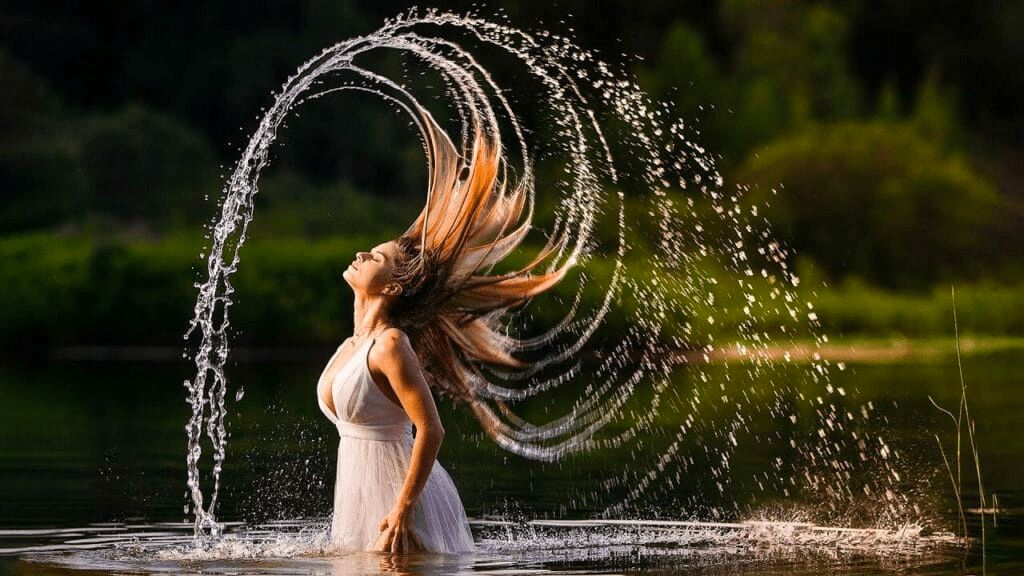
Shutter speed is exactly what it sounds like, the speed at which your shutter opens and then closes. Goes without saying that the longer the shutter is open the more light there is being let in. Shutter speed affects your exposure by controlling how much light is let into the camera. If you have a fast shutter speed, something like 1/4000 of a second, this will let a very low amount of light in. However, this is how you effectively capture fast-moving things such as cars, runners, or even a model flipping her hair in the water. remember the higher the shutter speed the more crisp or frozen your image will be.
fast shutter speed
The other half of the coin is that there is not much light coming into the camera; you’ll have to change your other settings to fix your image exposure. If you don’t plan on taking photos of something moving at a fast pace then I suggest 1/125 of a second. This is my go-to shutter speed when I’m just looking to go out and take pictures of still objects or people. This will allow you to still have a photo that was taken hand-held with no motion blur.
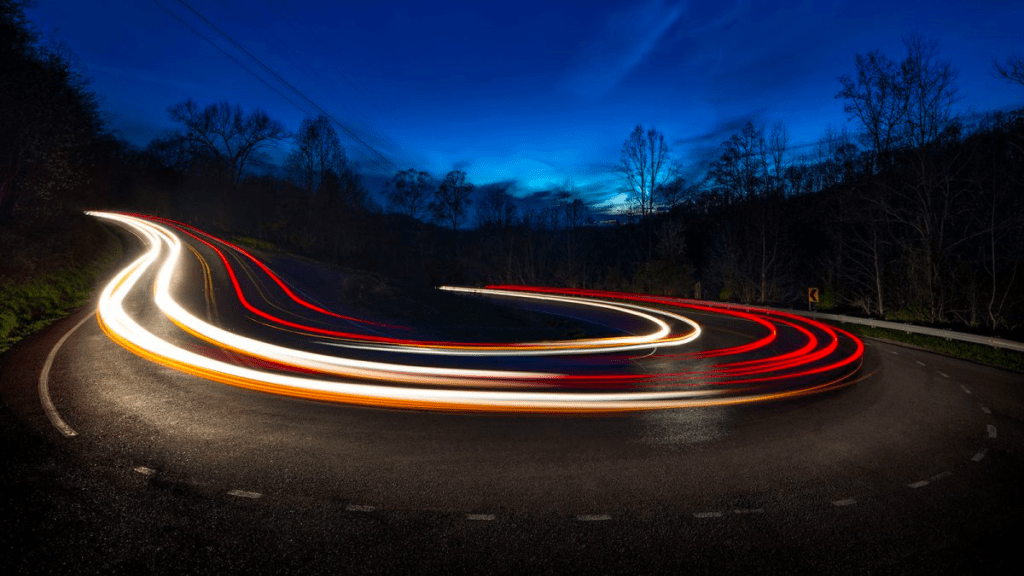
Now for the other side of shutter speed, long exposure images. This is when you leave the shutter open for more than a few seconds, which allows a much longer exposure to light for the camera. With a long exposure, you can create really interesting images like the one you see above.
This image was most likely a ten to thirty second long exposure which allowed the photographer to capture the trails of light left by passing cars. But keep in mind if you plan on doing a long exposure, you have to be aware of how much light there is around you and adjust accordingly.
What is Aperture?
Aperture, a crucial camera setting, regulates the amount of light entering your lens by adjusting its width. Wider openings, indicated by lower f-stops like f/1.4, allow more light, while narrower ones, such as f/16, reduce light. Understanding this may seem counterintuitive initially. Lower f-stops mean more light, higher f-stops mean less. Each change doubles or halves the light. Adjusting aperture necessitates a corresponding change in another parameter to maintain exposure. Apart from light control, aperture influences depth of field. Wider openings, like f/2.0, yield a shallower depth of field. It’s essential to decide beforehand the desired sharpness or background blur. Lenses show less vignetting and increased sharpness when stopped down 1-2 stops from wide open. Mastering aperture enhances your control over both light and the visual depth of your images.
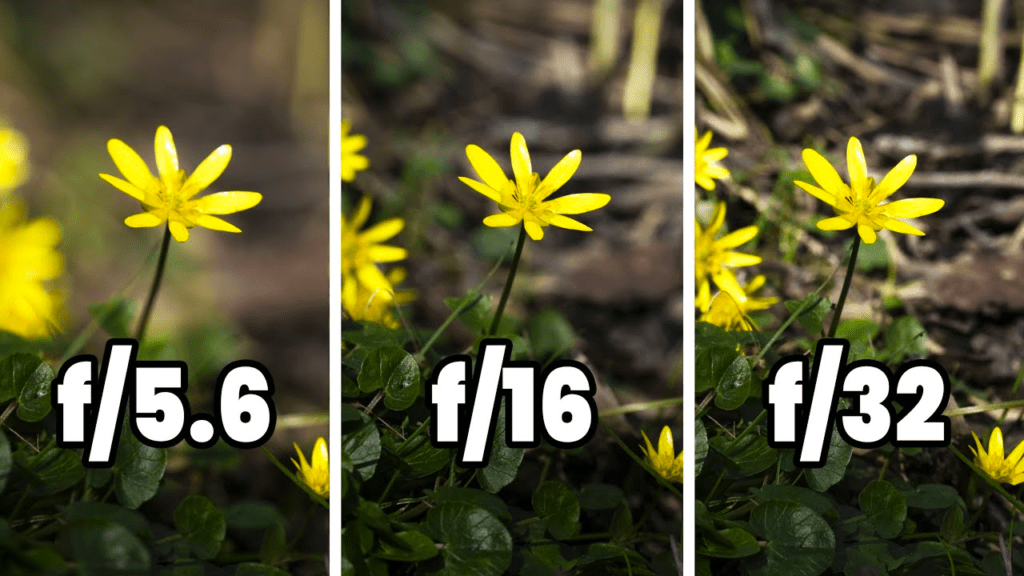
This is an example of the difference between f-stops, the smaller the number, the smaller the depth of field but also the more light you let in. As the f-stop number increases, so does the depth of field. But you do lose light which you can compensate for with shutter speed or ISO.
What is ISO?
ISO is a very important setting that you have to be very mindful when using. The camera is able to amplify the light its sensor recices by specific adjustable amounts. Those stop settings are from low amplification to high. ISO stops look something like 100, 200, 400, 800, 1600, to 3200. Typically you want to shoot with the lowest ISO speed you can while still maintaining a good exposure with your other settings. Why you may ask? Because as the sensor amplifies your amount of light to increase brightness in low light environments, it increases the amount of noise and decreases the amount of detail as a result. This can be a problem. It is better to have a noisy image that you can fix in post than a blurry image that you cannot fix.
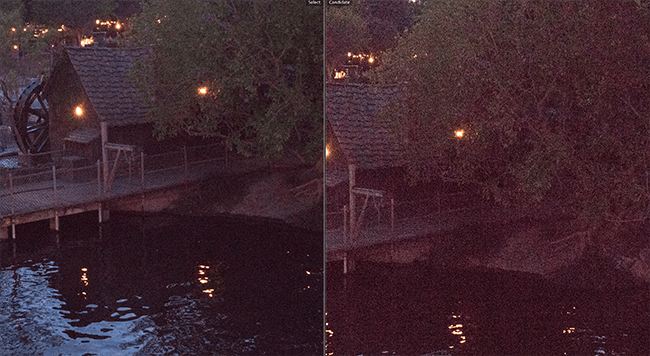
On the right you can see an image with a high ISO. it has a lot of noise and you lose detail. On the left you see the same image with a lower ISO with different shutter speed and aperture to create a high quality image.
How to properly expose your photos
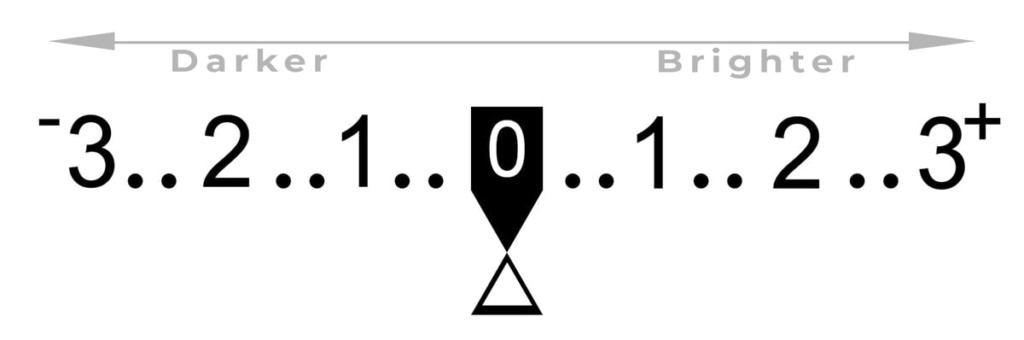
Below is an exposure meter. You can find it at the bottom of your viewfinder. If you have a screen on your camera with your settings then it will be there. With it, you can know if you are over-exposed, properly exposed, or under-exposed and by how many stops of light. The more to the left you are the more light you need to add and the more to the right you are the less light you will need. This small but crucial part of the camera will help you find the correct exposure with minimal effort. Remember, only change one setting at a time, and when you change the setting of aperture, ISO, or shutter speed, three clicks are equal to one stop of light.
Camera Settings Example:
In a nutshell, shutter speed (Duration of light) + aperture (amount of light) + ISO (sensitivity to light) = Exposure. Exposure is a balancing game between those three settings. If you move one up you need to move another down and vice versa.
For instance, if capturing a flower close to the ground in midday with a desire for a shallow depth of field, settings might be: 1/400 (shutter speed), f/2.0 (aperture), ISO 100. Wanting a slightly larger depth of field for more background detail, I adjusted the aperture from f/4.0 to f/5.6 (equal to one stop of light). This change took away light, so I compensated by decreasing the shutter speed by a stop. From 1/400, I adjusted it to 1/200, as reducing light by a stop means halving the shutter speed. This adjustment ensures proper exposure while altering the aperture and depth of field. Understanding these interconnections allows you to achieve desired effects in your photos.
keep in focus
There are no set settings that fit a given environment. You will always have to adjust them depending on the photo you want. You just have to play and guess to start out. As time goes forward you’ll start to gain experience to a point where you can walk into an environment and know what settings you’ll need. Just remember, photography is a learning curve that you never truly get around. There is always something new to try and learn from. If you would like more information on different camera settings then check out my blog about the most used Camera Settings. Have fun with it and enjoy the ride because it will take you places you never thought possible. Stay in focus, my friends.
To learn more about the aspects of photography, check out more of my blogs!