Welcome to the enchanting world of creative photography, where every click tells a unique story and every image is a canvas waiting to be painted with your imagination. In this blog post, we’ll delve deep into the realms of creative photography, exploring a variety of interesting photo ideas, the art of capturing them, and the magic of post-processing. Whether you’re a budding photographer seeking inspiration or a seasoned pro aiming to revitalize your portfolio, join us on this journey to discover the endless possibilities of creative photography.
Table of Contents
The Creative Art of Silhouettes
How to Use Reflections for Interesting Images
Levitation: Surreal Images
Capturing the Essence of Light Painting
Macro Magic: Tiny Worlds, Big Impact
Double Exposure: Merging Realities
Continue Your Creative Photography Adventure
The Creative Art of Silhouettes
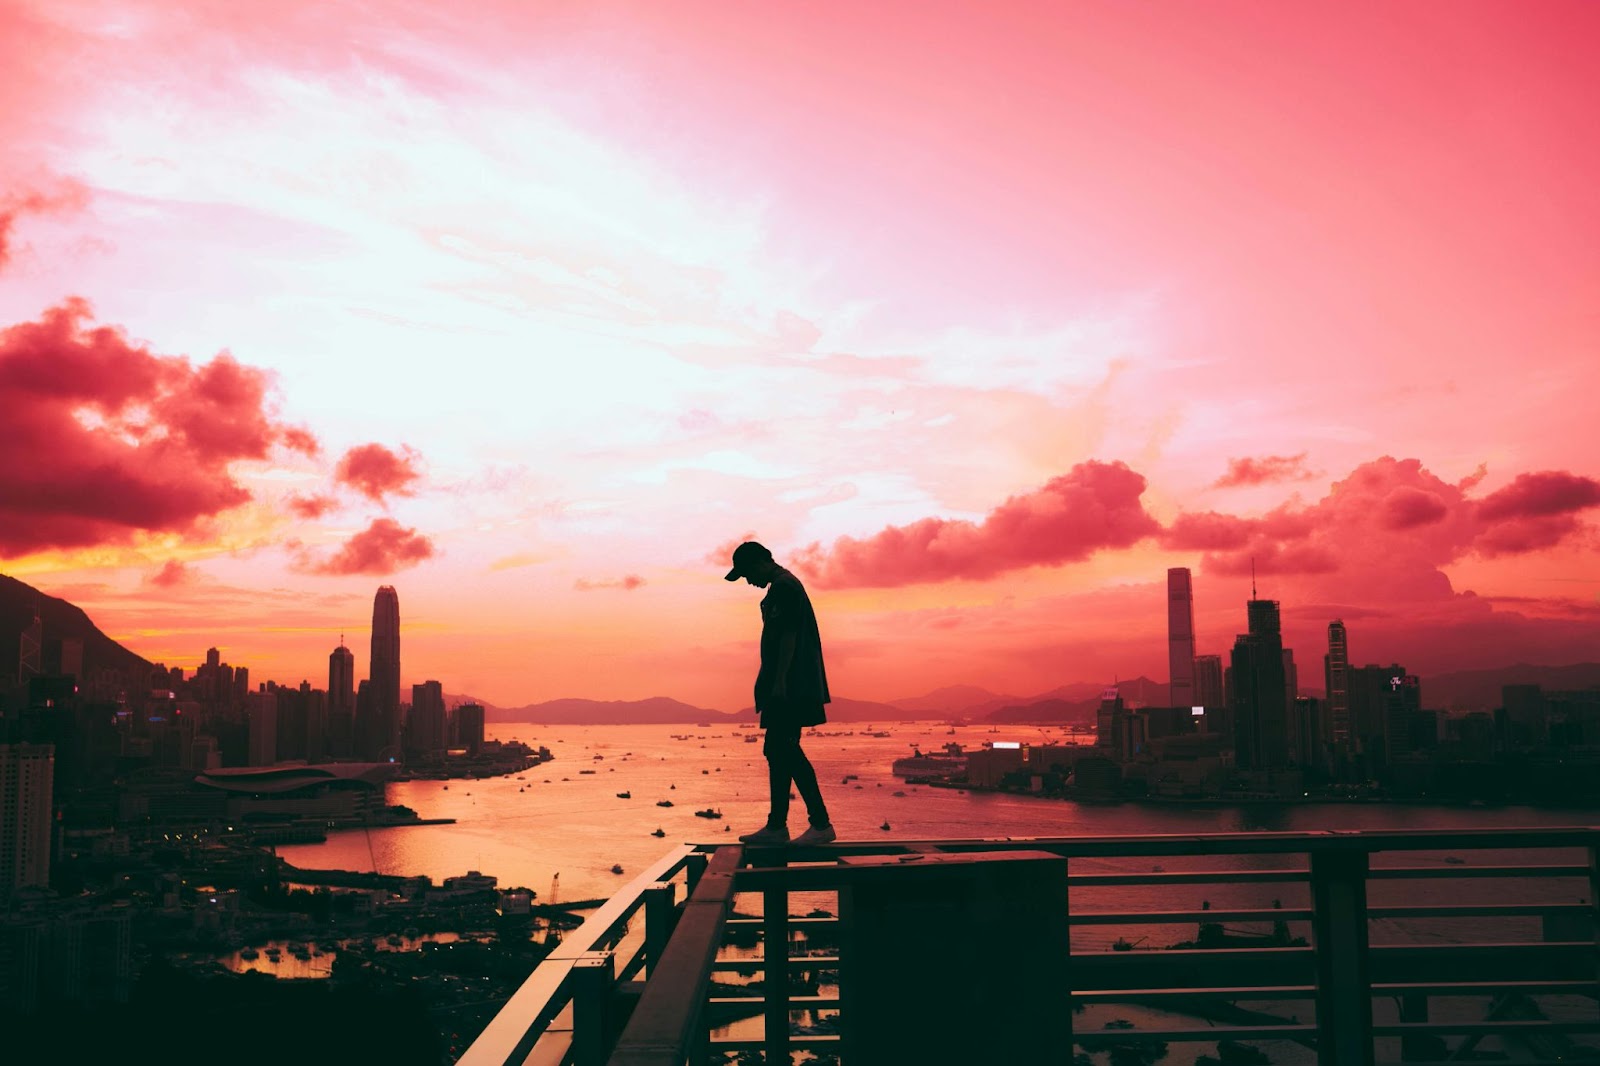
Creating the Image
Silhouettes are a powerful way to convey emotion and drama in your photos. To achieve a striking silhouette, position your subject against a bright background, such as the sky during sunset. Set your camera to manual mode, underexpose the shot, and focus on the outline of the subject.
Ideal Locations
Look for open spaces with clear horizons, like beaches or hilltops, to capture clean and defined silhouettes. Cityscapes at twilight also provide an urban twist to silhouette photography.
Editing Tips
Enhance the contrast to make the silhouette pop. Adjust the shadows and highlights to bring out details without compromising the silhouette effect.
Examples and Techniques
Experiment with different subjects for silhouettes, such as trees, animals, or even people in dynamic poses. Utilize backlighting to enhance the outline of your subject. To add a touch of mystery, try capturing silhouettes in misty or foggy conditions.
Special Gear/Props
Consider using a telephoto lens to zoom in on your subject and create a more dramatic silhouette. Using props like hats or umbrellas can add interesting shapes to your silhouettes.
Advanced Editing Tips
Take your silhouette images to the next level by experimenting with color grading. Introduce warm or cool tones to the background to evoke different emotions. Use selective editing to enhance the details of specific areas, such as the edges of the silhouette.
How to Use Reflections for Interesting Images
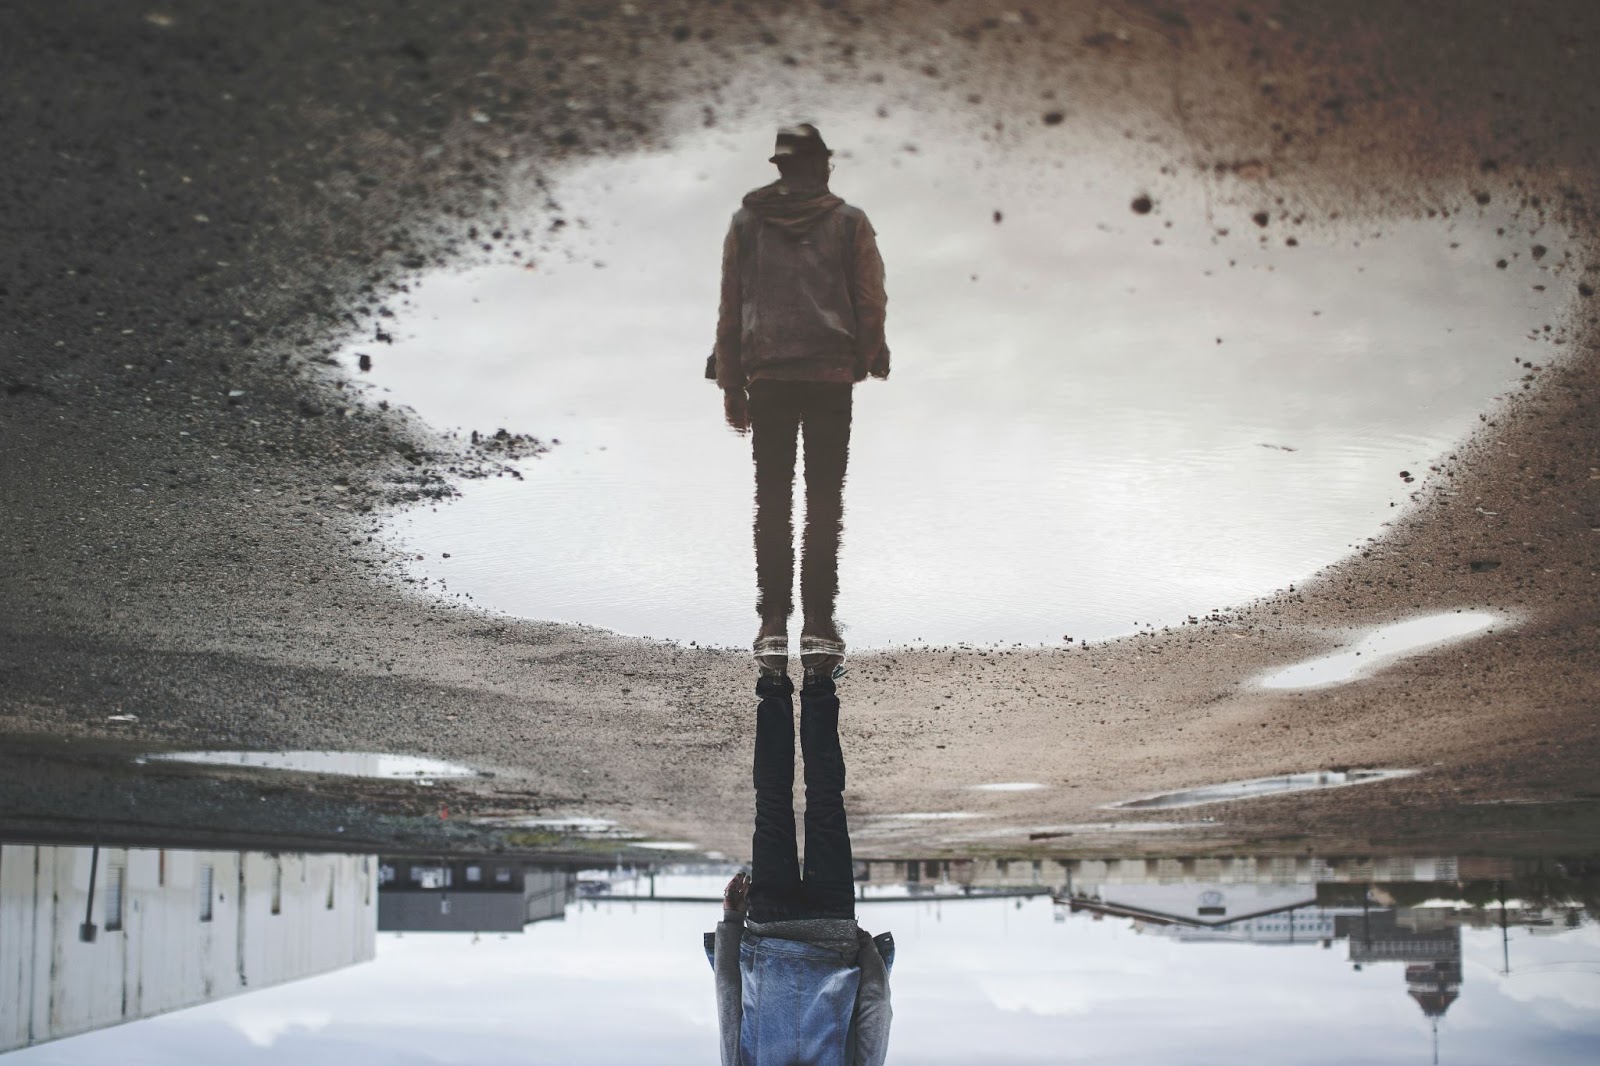
Creating the Image
Reflections add depth and visual interest to your photographs. Seek out still bodies of water or shiny surfaces after rainfall. Position your camera low to the ground for maximum reflection impact.
Ideal Locations
Lakeshores, puddles, and urban environments with glass facades are great for capturing captivating reflections. Experiment with different angles to find the most compelling shot.
Editing Tips
Enhance the vibrancy of the reflected elements and adjust the saturation to make the image more visually appealing. Consider cropping to emphasize the reflection.
Examples and Techniques
Capture reflections during different times of the day to play with changing light conditions. Experiment with incorporating moving elements, such as people or vehicles, for dynamic reflections. Utilize wide-angle lenses for expansive reflective surfaces.
Special Gear/Props
Consider using a polarizing filter to reduce glare and enhance the clarity of reflections. Utilize a sturdy tripod to maintain a steady composition, especially for long exposure shots.
Advanced Editing Tips
Experiment with split toning to add subtle color variations to the reflection and the surrounding scene. Use graduated filters to balance exposure between the reflection and the rest of the image. Consider creating a composite image by blending multiple reflection shots for a surreal effect.
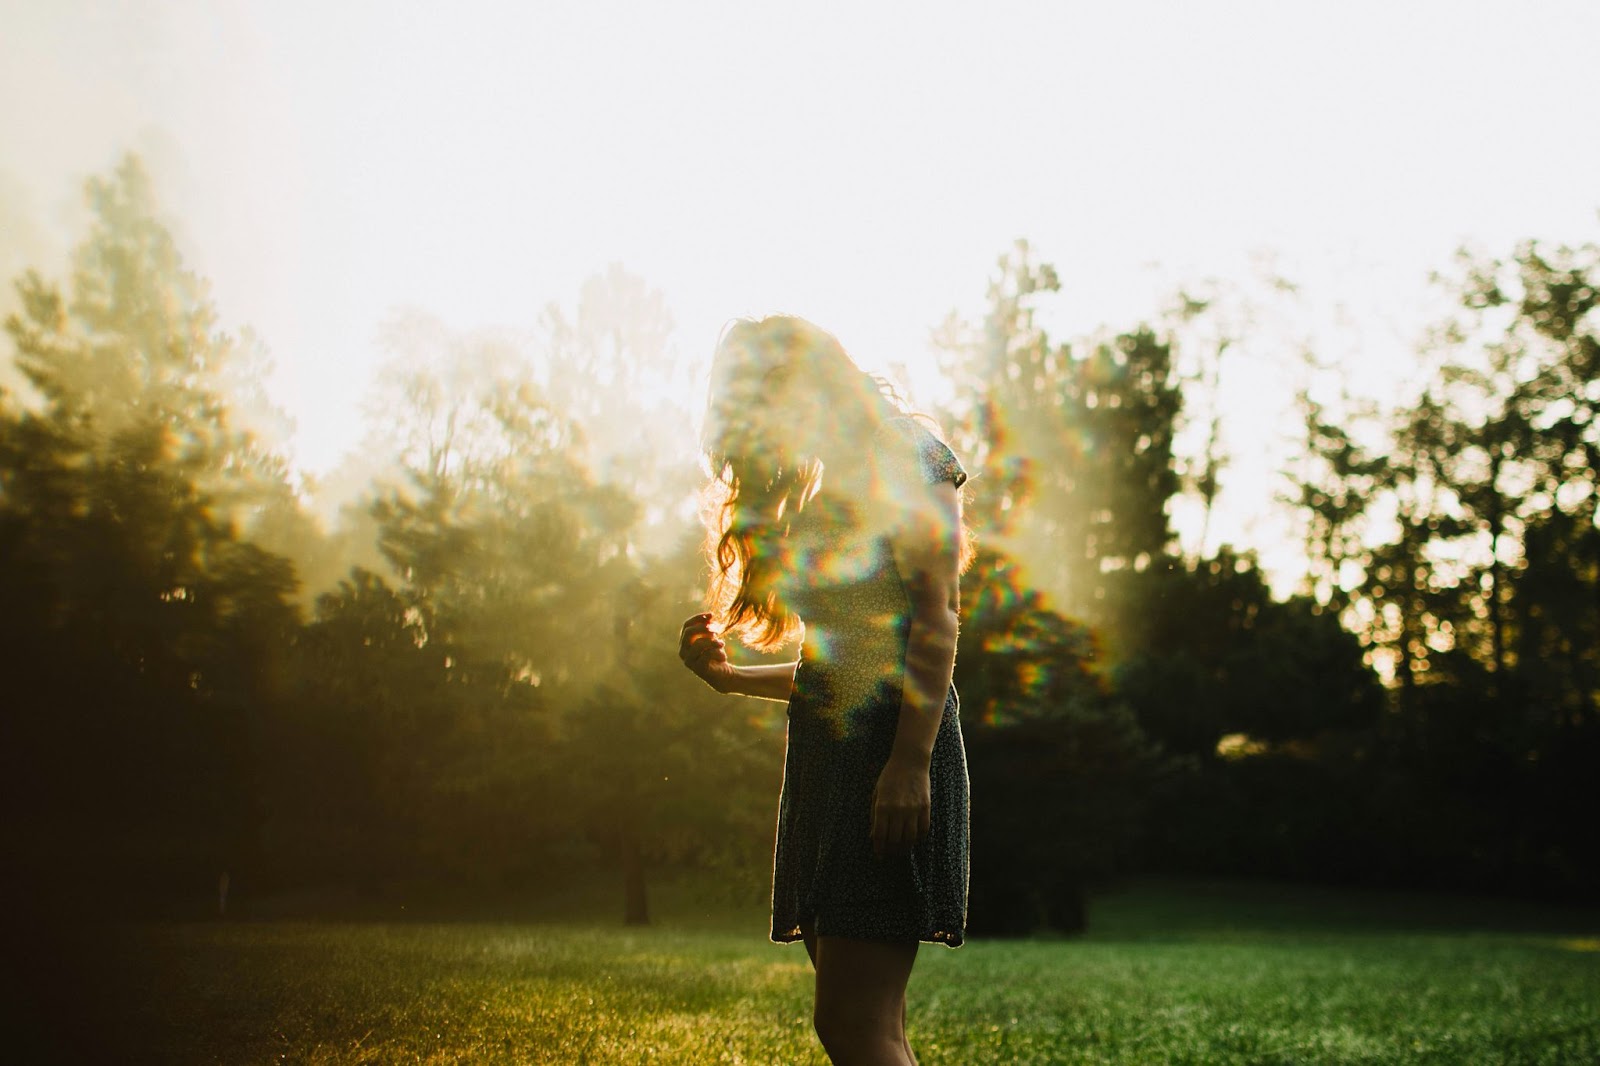
Levitation: Surreal Images
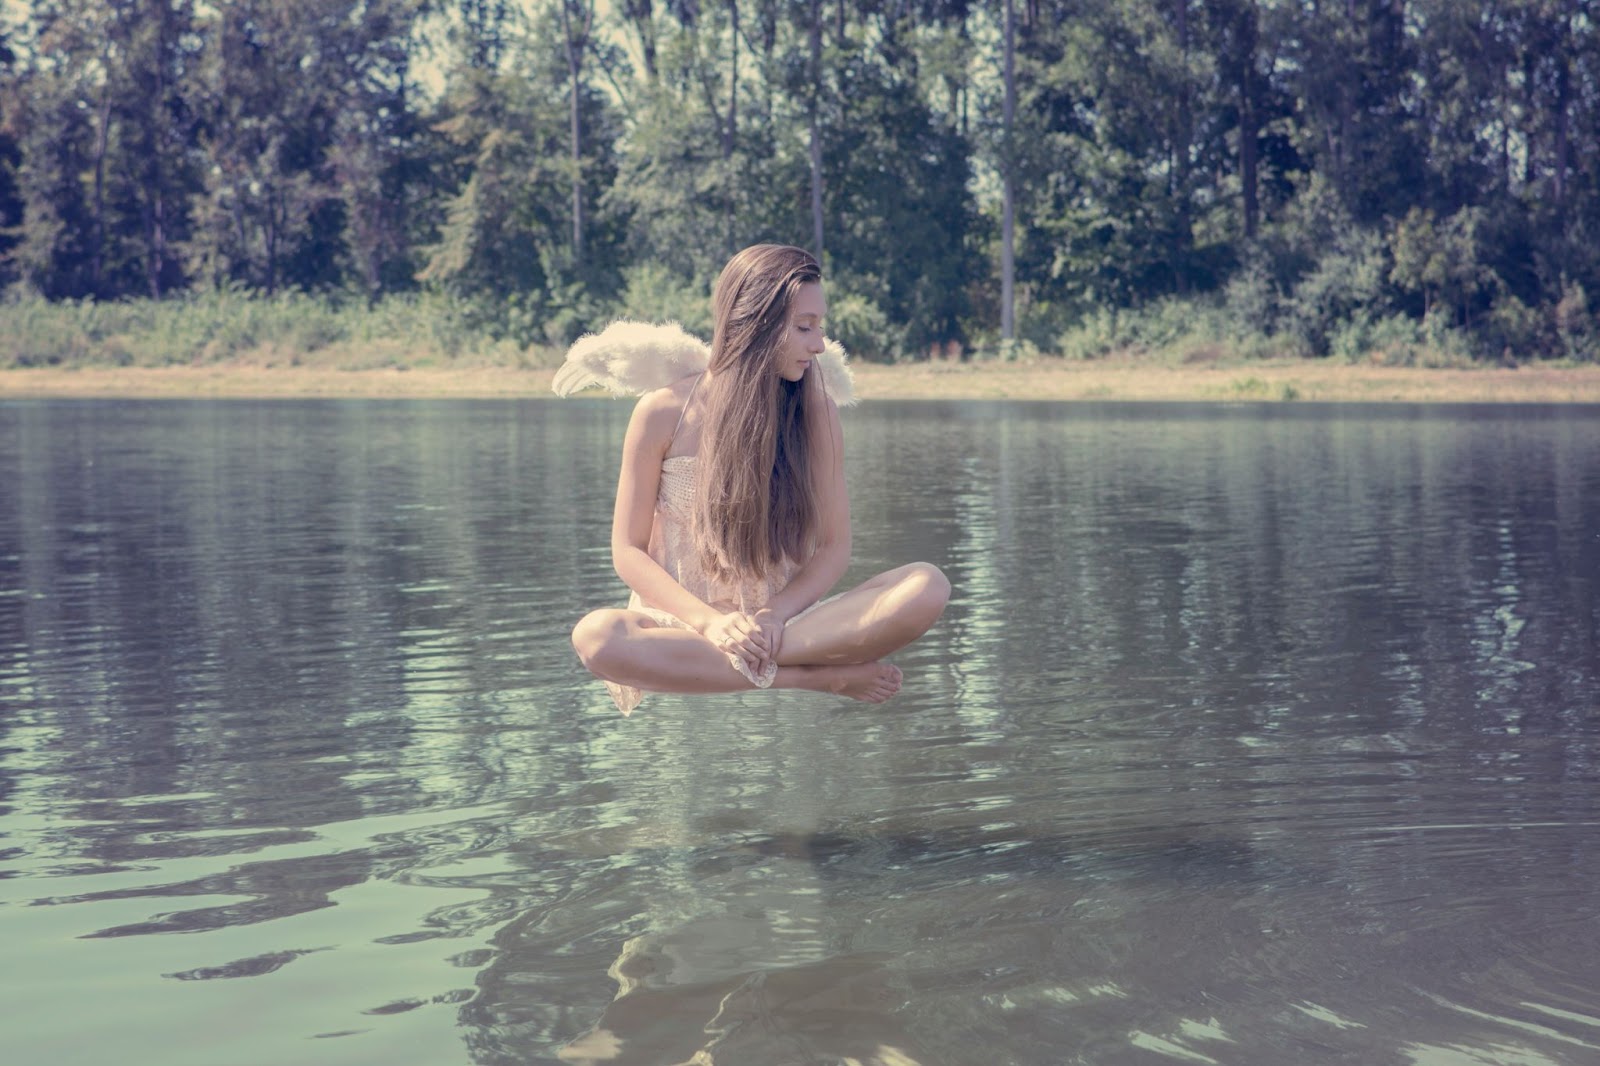
Creating the Image
Levitation photography creates an otherworldly and dreamlike atmosphere. Capture a series of shots of your subject jumping or floating in the air. In post-processing, layer the images to create the illusion of levitation.
Ideal Locations
Choose locations with open space and a distinct background. Parks, rooftops, and natural landscapes work well to emphasize the magical aspect of levitation photography.
Editing Tips
Focus on seamless blending of images, paying attention to lighting and shadows. Experiment with color grading to enhance the surreal nature of the levitation effect.
Examples and Techniques
Explore different poses and actions for your levitating subject. Play with props such as balloons or fabric to add dynamics to the image. Experiment with levitation in different weather conditions for unique effects.
Special Gear/Props
Invest in a sturdy tripod to ensure consistent framing across multiple shots. Utilize a remote shutter release or a self-timer to avoid camera shake. Consider using a fast shutter speed to freeze the motion of your levitating subject.
Advanced Editing Tips
Experiment with adding additional elements, such as birds or clouds, to enhance the dreamlike quality of the image. Utilize the clone stamp tool to remove any supporting props or equipment used during the shoot. Fine-tune the color balance to create a cohesive and harmonious composition.
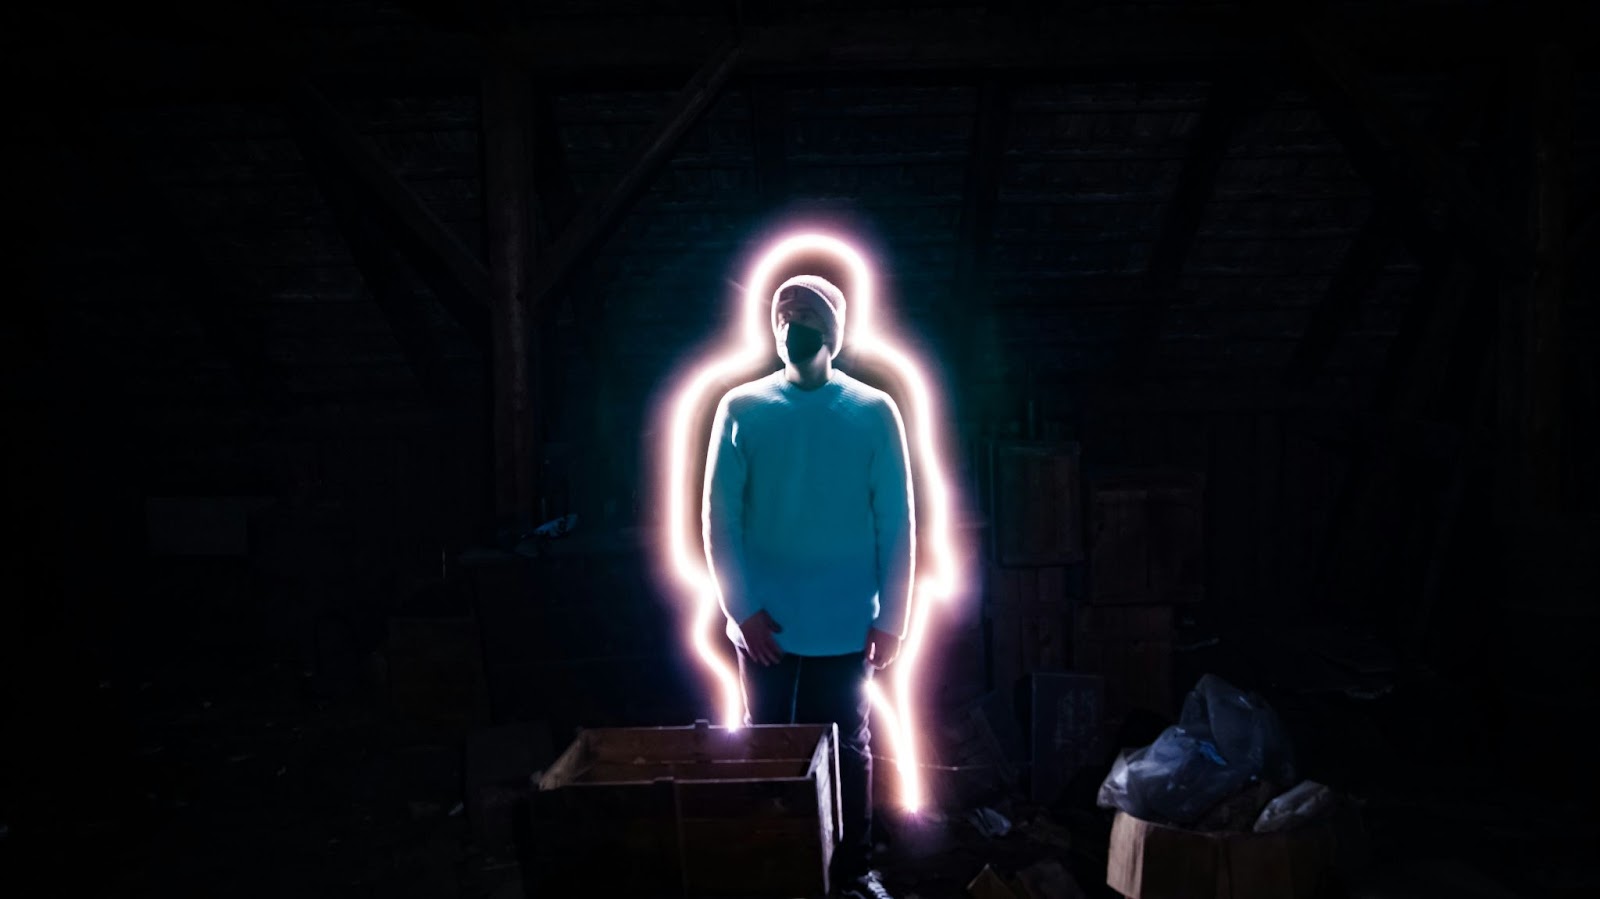
Capturing the Essence of Light Painting
Creating the Image
Light painting involves using light sources to ‘paint’ on a dark canvas. Set your camera to a long exposure, use a tripod, and experiment with various light tools such as flashlights or glow sticks to create unique patterns.
Ideal Locations
Nighttime scenes with minimal ambient light (light pollution) provide the best canvas for light painting. Urban environments, parks, and deserted buildings can add an extra layer of intrigue.
Editing Tips
Adjust the exposure to highlight the painted light trails. Experiment with color temperature to create a mood that complements your light painting.
Examples and Techniques
Experiment with different light sources, such as colored LEDs or sparklers, to create diverse effects. Try combining multiple light painting techniques in a single image for a more intricate result. Consider creating shapes or writing words with your light source.
Special Gear/Props
Invest in a variety of light tools and accessories for versatility. Use a lens hood to prevent unwanted light flares. Consider using a wide-angle lens to capture a larger area during light painting.
Advanced Editing Tips
Fine-tune the color balance of individual light elements to create a cohesive and visually appealing composition. Experiment with layer blending modes to add depth and complexity to your light painting. Use selective editing to emphasize specific areas of the image where the light trails are most vibrant.
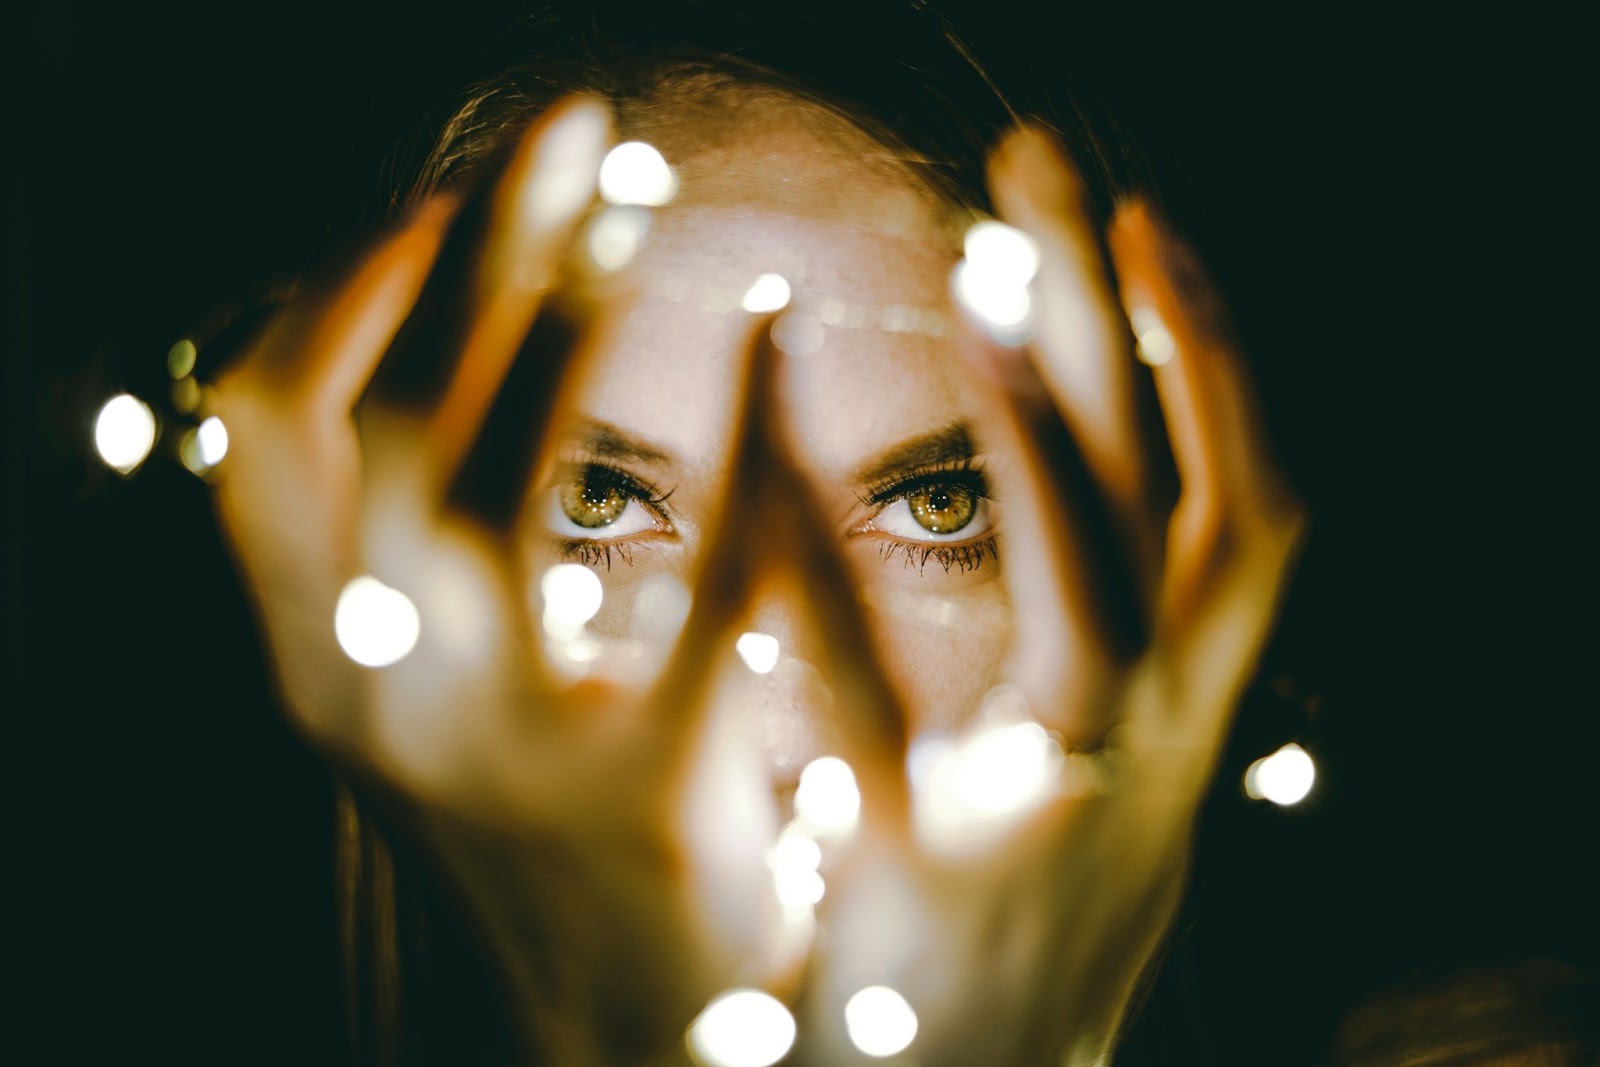
Double Exposure: Merging Realities
Creating the Image
Double exposure combines two separate images into one, creating a surreal and ethereal effect. Experiment with blending portraits with nature scenes or urban landscapes for a captivating result.
Ideal Locations
Urban environments with a mix of architecture and nature provide an ideal backdrop for double exposure photography. Capture both images with a similar color palette for a harmonious blend.
Editing Tips
Fine-tune the opacity and blending modes to achieve the desired effect. Experiment with different combinations to find the most visually appealing result.
Examples and Techniques
Combine contrasting elements, such as a person with cityscapes or landscapes, for a visually striking double exposure. Experiment with silhouette double exposures for added drama. Try merging images with different textures for a unique effect.
Special Gear/Props
Use a camera that offers a built-in double exposure mode for ease of use. Consider using a tripod for stability, especially when shooting multiple exposures. Experiment with multiple exposures in different lighting conditions for diverse results.
Advanced Editing Tips
Experiment with color grading to unify the color tones of both images and create a seamless blend. Utilize the curves adjustment tool to control the contrast and tonal range in different parts of the double exposure. Consider adding a subtle vignette to draw attention to the central elements of your merged realities.
Macro Magic: Tiny Worlds, Big Impact
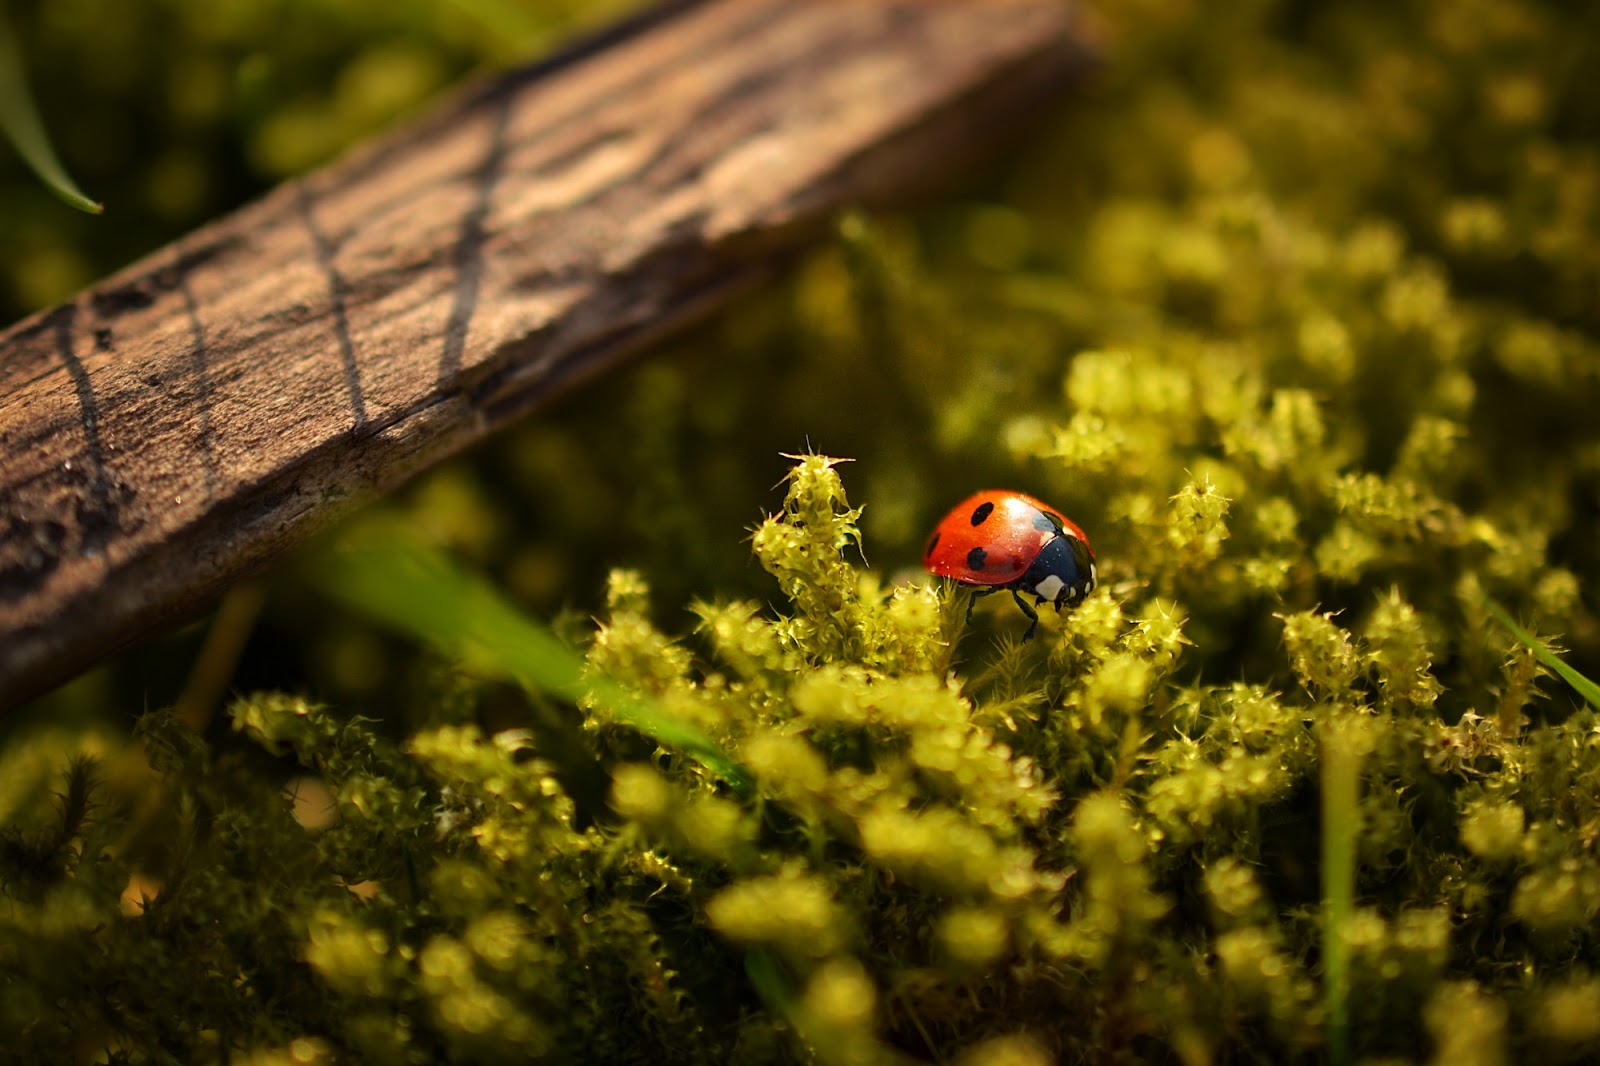
Creating the Image
Macro photography unveils the beauty in the small details. Invest in a macro lens to capture intricate textures and patterns. Use a tripod to ensure sharp focus and experiment with different angles.
Ideal Locations
Natural settings like gardens, forests, or even your backyard offer a wealth of subjects for macro photography. Look for vibrant colors and interesting textures.
Editing Tips
Focus on sharpening the details and adjusting the color balance to bring out the richness of the tiny world you’ve captured. Consider cropping to emphasize specific details.
Examples and Techniques
Explore the world of insects, flowers, and everyday objects up close. Utilize diffused lighting to avoid harsh shadows in macro photography. Experiment with different apertures to control the depth of field and isolate your subject.
Special Gear/Props
Invest in a quality macro lens for sharp and detailed close-ups. Use a tripod and a remote shutter release to minimize camera shake. Consider using a ring flash or an external light source for controlled lighting.
Advanced Editing Tips
Experiment with focus stacking to combine multiple images and achieve greater depth of field in your macro shots. Fine-tune the color saturation and vibrancy to enhance the natural colors of your macro subjects. Utilize sharpening tools with caution to maintain the delicate details of your tiny world.
Continue Your Creative Photography Adventure
Congratulations on embarking on a journey into the realm of creative photography! By unlocking the potential of your camera and embracing experimentation, you’ve taken the first steps toward making every click a masterpiece. Remember, creativity knows no bounds, so continue pushing the boundaries and exploring the vast landscape of photographic possibilities.
For more in-depth information about photography, tips, and tricks, check out my blog posts! Dive deeper into the endless possibilities of creative photography and elevate your skills to new heights.