
Welcome to the fascinating world of photography, where mastering your camera settings can elevate your photography game to new heights. Whether you’re a beginner eager to understand the basics or an enthusiast looking to fine-tune your skills, this page is all you need to understand camera settings. We’ll dive deep into essential aspects like Aperture, ISO, Shutter Speed, Camera Modes, White Balance, Focus Modes, Metering, and Drive Mode. So let’s jump into it and take a look into your camera’s awesome settings together.
Table of Contents
Aperture
ISO
Shutter Speed
Camera Modes
White Balance
Focus Modes
Metering
Drive Mode
Additional Tips
Conclusion
The Fundamentals of Exposure

You cannot understand many setting without first understanding aperture, ISO, and shutter speed. Below is a brief overview of what they do and how they affect exposure. For more information go to my page explaining the fundamentals of exposure.
Aperture
Understanding the Eye of Your Lens
Aperture, often referred to as the eye of your lens, plays a crucial role in controlling the amount of light entering your camera. Learn how to manipulate aperture to achieve stunning depth of field effects and capture the perfect shot. For example, widening the aperture (lower f-stop) can create a beautiful background blur, ideal for portrait photography.
ISO
Shedding Light on Sensitivity
ISO settings determine your camera’s sensitivity to light. Find out how to strike the right balance, avoiding grainy images in low light conditions while maintaining optimal image quality. Increasing ISO (sensitivity) is useful in low-light situations, like indoor events, where you need faster shutter speeds to freeze motion without a flash.
Shutter Speed
Capturing Time in a Frame
Explore the dynamic world of shutter speed and discover how it affects the motion blur in your photos. From freezing fast action to creating artistic long-exposure shots, shutter speed is a powerful tool at your disposal. Slow shutter speeds can capture the motion blur of flowing water or moving vehicles, adding a sense of dynamism to your images.
Camera Modes
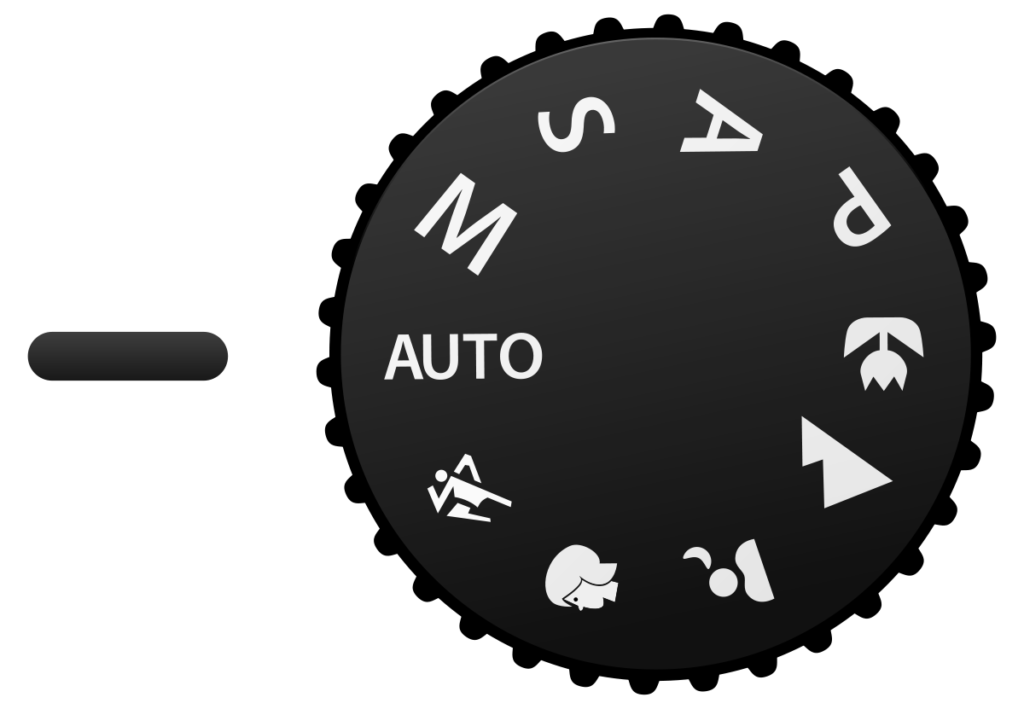
Understanding the various camera modes opens up a realm of creative possibilities. Let’s explore each type and understand what it does and when to use it.
Auto Mode:
Auto mode is perfect for beginners. The camera takes control of all settings, making it easy to capture decent shots without worrying about technical details. Ideal for casual shooting. Use Auto Mode when you want a quick point-and-shoot experience, suitable for everyday snapshots.
Program Mode:
Program mode provides some manual control while still handling essential settings. It’s great for users who want a bit of control without diving into full manual mode. Suitable for general shooting situations. Program Mode is handy when you want a balanced exposure but desire some creative input, allowing adjustments without fully manual control.
Aperture Priority (Av/A):
Aperture Priority allows you to control the aperture setting while the camera adjusts other settings. Use it when you want to control depth of field, such as in portrait or landscape photography. Choose Aperture Priority for creative control over background blur or sharpness in specific shooting scenarios.
Shutter Priority (Tv/S):
Shutter Priority lets you set the shutter speed while the camera adjusts other settings. Useful for capturing motion, it’s ideal for sports or wildlife photography. Shutter Priority is essential when freezing or emphasizing motion; use it for sports to capture crisp action or to create intentional motion blur in creative shots.
Manual Mode (M):
Manual mode gives you full control over all settings. Perfect for experienced photographers who want complete creative control. Use it in situations where you need precision, such as studio photography. Manual Mode is indispensable when you need precise control over exposure settings, making it ideal for studio work or situations with challenging lighting.
Bulb Mode:
Bulb mode keeps the shutter open as long as the shutter button is pressed. This is used for long-exposure shots, especially in low-light conditions or capturing star trails. Bulb Mode is essential for capturing long-exposure shots, like star trails or fireworks, where extended shutter opening is required.
continuing on
Those are the main Camera modes you’ll be using and focusing on. However, if you would like more information on how to use them more creatively then check out this guide on camera modes.
White Balance
White balance is a critical aspect of photography that ensures accurate color reproduction in different lighting conditions. It adjusts the colors in your photos to neutralize the effects of warm (yellow) or cool (blue) lighting, providing a true representation of the scene.
The Kelvin Scale
The Kelvin scale, measured in degrees Kelvin (K), quantifies the color temperature of light. Lower values (e.g., 2500K-4000K) represent warm tones, while higher values (e.g., 5000K-7000K) indicate cool tones. Understanding the Kelvin scale empowers photographers to manually set the white balance for specific lighting scenarios.
Types of White Balance
Auto White Balance (AWB):
The camera automatically adjusts the white balance based on its perception of the scene. While convenient, it may not always produce accurate results, especially in challenging lighting conditions. Use Auto White Balance when shooting in changing lighting conditions where manual adjustments may be impractical.
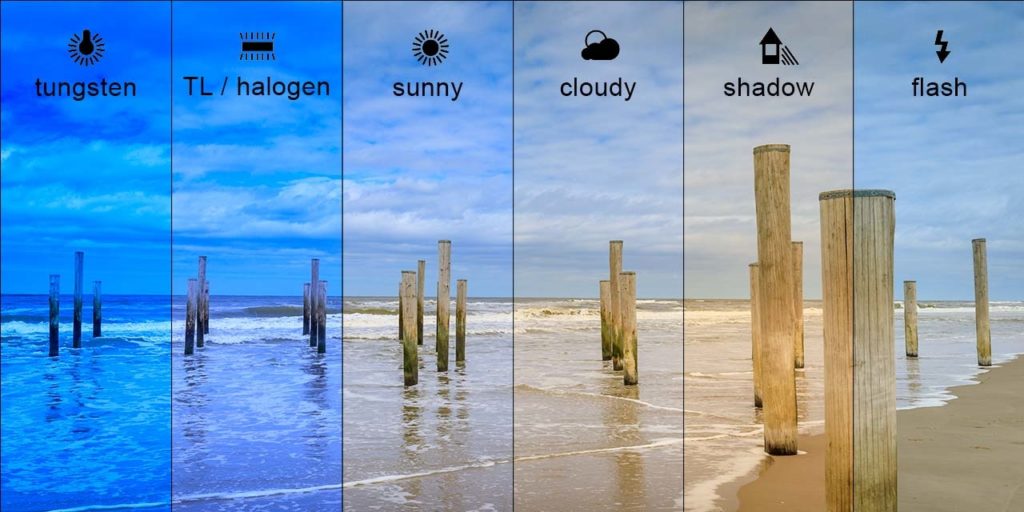
Daylight (Sunny) White Balance:
Ideal for outdoor shots in direct sunlight, this setting enhances the warmth of the scene. Daylight White Balance is perfect for outdoor portraits or landscapes on sunny days, emphasizing warm tones.
Cloudy White Balance:
Adds warmth to compensate for the cool tones on cloudy days, creating more vibrant and natural colors. Cloudy White Balance enhances colors on overcast days, preventing a bluish tint in your images.
Shade White Balance:
Similar to cloudy but adds more warmth, suitable for scenes in the shade to counteract the bluish tint. Shade White Balance is ideal when shooting in shaded areas, preventing the cool tones associated with shadowed environments.
Tungsten/Incandescent White Balance:
Corrects the warm tones produced by tungsten and incandescent lighting, ensuring neutral colors. Tungsten White Balance is essential for indoor shooting under tungsten lighting, preventing the orange cast associated with such light sources.
Fluorescent White Balance:
Counters the greenish tint often present in fluorescent lighting, providing more accurate colors. Fluorescent White Balance corrects the greenish hue produced by fluorescent lights, ensuring natural color reproduction.
Flash White Balance:
Optimized for use with a camera’s built-in flash, ensuring balanced colors in flash-lit scenes. Flash White Balance ensures accurate color reproduction when using your camera’s built-in flash.
Custom White Balance:
Manually set the white balance based on a reference point, such as a neutral gray card, for precise color correction in specific conditions. Custom White Balance is crucial when shooting in unique lighting conditions, providing the most accurate color representation.
Understanding these white balance settings empowers you to capture images with true-to-life colors in various lighting scenarios. However it can also be a fun experience to use multiple or all the different white balance settings in one environment. You can get some pretty interesting shots.
Focus Modes
Bringing Subjects into Sharp Focus

Mastering focus modes is crucial for achieving sharp and clear images. Let’s explore each type and understand what it does.
Single-shot AF:
Ideal for stationary subjects, this mode locks focus when the shutter button is halfway pressed. Single-shot AF is perfect for capturing still subjects like portraits or landscapes, ensuring accurate and precise focus.
Continuous AF:
Perfect for capturing moving subjects, continuous autofocus adjusts focus as long as the shutter button is held down. Continuous AF is essential for action shots or wildlife photography, ensuring continuous focus on a moving subject.
Manual Focus:
Provides complete control to the photographer, allowing manual adjustment of focus. Manual Focus is indispensable when precise control over the focus point is required, such as in macro photography or when using manual focus lenses.
Auto AF Area Selection:
The camera automatically selects the focus point based on the scene. Auto AF Area Selection is convenient when shooting scenes with multiple subjects, letting the camera choose the focus point for you.
Single-point AF:
Allows the photographer to manually select a specific focus point for precise focusing. Single-point AF is ideal for situations where you want precise control over the focus point, ensuring sharp focus on a specific part of the scene.
Dynamic Area AF:
This mode uses a group of focus points to track and maintain focus on moving subjects. Dynamic Area AF is beneficial when photographing subjects with unpredictable movement, ensuring continuous focus within a selected area.
Understanding and mastering these focus modes empowers photographers to tackle a variety of shooting scenarios. For more detailed information on how to use focus modes, click now.
Metering

Understanding metering modes is essential for achieving well-exposed photos. Let’s explore each type and understand what it does.
Evaluative Metering:
The camera evaluates the entire scene, considering various factors to determine the best overall exposure. Evaluative Metering is versatile, suitable for general shooting situations where an overall balanced exposure is desired.
Center-weighted Metering:
Gives more importance to the center of the frame, useful for portraits or when the subject is centrally positioned. Center-weighted Metering is ideal for portraits, ensuring accurate exposure for the subject while considering the overall scene.
Spot Metering:
Focuses on a small spot in the frame, allowing precise exposure control for specific areas. Spot Metering is essential when you want to meter for a specific part of the scene, ensuring accurate exposure for that area.
Partial Metering:
Similar to spot metering but covers a larger area, providing a balance between precision and versatility. Partial Metering is suitable for situations where you need more control than evaluative metering but less precision than spot metering.
Matrix Metering:
The camera analyzes the entire scene and uses a database to determine the best exposure settings. Matrix Metering is a well-balanced metering mode suitable for a variety of scenes, providing reliable exposure in most situations.
Understanding and using these metering modes appropriately enables photographers to achieve accurate exposures in various lighting conditions. However, if you’re still confused, check out this guide on Understanding Metering and Metering Modes for a deeper dive into the topic.
Drive Mode
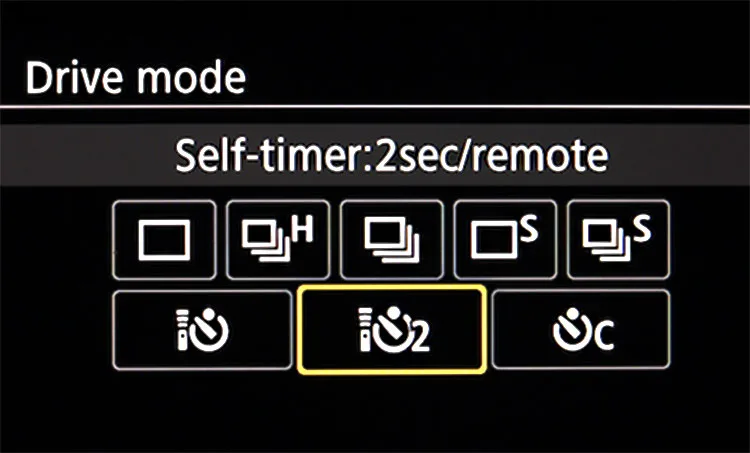
Explore the creative possibilities of drive mode, from capturing rapid sequences to ensuring you never miss the perfect moment. Understand when to use single-shot, continuous, or self-timer modes.
Single-shot Mode:
Ideal for capturing individual, static subjects. The camera takes a single shot with each press of the shutter button. Single-shot Mode is perfect for scenarios where precise timing is crucial, such as capturing a single moment in street photography.
Continuous Mode:
Perfect for fast-paced action or capturing a series of images in quick succession. The camera continuously takes shots as long as the shutter button is held down. Continuous Mode is essential for sports photography or any situation where capturing a sequence of fast-moving events is crucial.
Self-timer Mode:
Useful when the photographer wants to be part of the picture or eliminate camera shake caused by pressing the shutter button. The camera delays capturing the image after a set time. Self-timer Mode is beneficial when you want to be in the frame or avoid camera shake in situations like long-exposure shots.
Bracketing Mode:
Enables the camera to capture a series of shots at different exposures. Useful for HDR (High Dynamic Range) photography to merge multiple exposures for a well-balanced image. Bracketing Mode is essential for capturing a range of exposures, particularly in high-contrast scenes where you want to merge images for maximum dynamic range.
Mirror Lock-Up Mode:
Minimizes vibrations caused by the movement of the camera’s mirror, ensuring sharp images, especially in long-exposure shots. Mirror Lock-Up Mode is crucial for long-exposure shots, reducing vibrations caused by mirror movement and ensuring sharp images in situations like astrophotography.
Understanding and utilizing these drive modes enhances a photographer’s ability to capture diverse scenes and achieve desired creative effects.
Fine-Tuning Your Craft: Additional Tips
Photography is an expansive realm beyond the fundamental camera settings. For insights into what makes a great photographer check out this article on 10 Photography Tips that will help elevate your photography craft.
Always remember to not be afraid to explore diverse areas, including mastering composition techniques, unraveling the intricacies of all your camera settings, and researching portrait lighting. Expand your horizons into various types of photography, tackling photography challenges, and gaining insights into color theory. If you’re interested in any of these topics check out the rest of my Blog Pages down below.
Conclusion
In conclusion, mastering camera settings is a journey that transforms the way you capture the world. Armed with the knowledge of aperture, ISO, shutter speed, and other crucial settings, you’re now equipped to unleash your creativity and capture breathtaking moments. Keep experimenting, keep learning, and watch your photography skills soar.